Linear text boxes were built for simple chat messages—not multi-step AI orchestration. When you are constructing complex LLM workflows that require context passing, persona definitions, and multi-model synthesis, copy-pasting text between browser tabs quickly turns into chaos.
Nodestr solves this by treating prompts as software pipelines on an infinite visual node canvas. In Nodestr, nodes themselves are the variables. Instead of cramming 500 words into a fragile text block or messing with brittle {{variable}} template strings, every prompt component is a discrete visual node block. You pull visual noodles between ports to connect your workflow with total transparency.
In this step-by-step masterclass, you will learn how to build your first visual prompt graph from scratch, chain modular node variables, pull noodles between ports, and route your outputs into a primary output hub.
Understanding the Visual Prompt Graph
Before placing your first node, let's break down the core structural elements of the Nodestr studio workspace:
- Canvas: The infinite spatial workspace where your nodes live. Pan, zoom, and arrange your ideas freely.
- Nodes: Modular building blocks that hold prompt instructions, context data, option selections, or output hubs.
- Ports: Connection points on node borders where noodles plug in. In Ports sit on the left edge, and Out Ports sit on the right edge.
- Noodles: The flexible connection cords that route prompt data from an Out port into an In port, carrying your prompt context downstream.
Step 1: Spawning Your First Prompt Node
Spawning a new node on the canvas is fast and seamless. Nodestr provides three official ways to add nodes to your workspace:
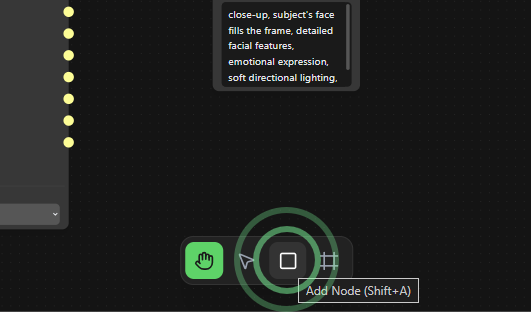
- The Floating Bottom Toolbar (Primary UI Method): Click the Square icon (Add Node button) on the 4-button dock at the bottom-center of your screen (
[Pan (H)] [Select (V)] [Add Node] [Frame (Shift+F)]). - Keyboard Shortcut (Power-User Method): Press Shift + A anywhere on the canvas to open the node creation menu directly at your mouse cursor.
- Left Sidebar Drag & Drop: Open the Left Sidebar, expand Built-in Presets or My Presets, and drag any preset card directly onto your canvas.
When the node creation menu opens (via Shift + A or the bottom toolbar), select Text Node to spawn your foundational prompt block.
Step 2: Modularizing Node Variables
Forget brittle bracket placeholders like {{variable_name}}. In Nodestr, each node acts as an independent variable block.
For example, to build a modular technical copywriting pipeline:
- Create Node A (Persona Anchor): Title the node "Senior Copywriter" and enter your role directive (e.g.
Act as a senior technical copywriter specializing in developer tools.). - Create Node B (Feature Description): Title the node "Product Features" and enter your raw product specs.
- Create Node C (Target Audience): Title the node "Audience Profile" and enter your ideal customer persona.
By separating role directives, product specs, and target audience into discrete nodes, you can tweak any individual component without touching surrounding prompt copy!
Step 3: Connecting Ports with Noodles
Now for the fun part: connecting your upstream nodes to flow prompt context downstream using noodles.
- Locate the Source Out Port: Look at your upstream source node (e.g. your "Persona Anchor" node). Find the circular Out port on its right edge.
- Pull a Noodle (Out Port → In Port Connection): Click and drag a noodle starting from the right Out port toward an In port (left side) of your downstream destination node. In Nodestr, noodles are connected by dragging from an Out port to an In port.
- Plug into the Destination In Port: Release the noodle onto an In port on your destination node. The noodle will snap into place with a subtle glow, signifying an active variable stream.
- Reorder In Ports via RMB Drag: Need to change the vertical sequence of input ports inside a node? Hold the Right Mouse Button (RMB) on an In port row and drag it up or down to reorder it instantly!
Step 4: Designating the Primary Output Hub
To synthesize your connected node variables into a unified executable prompt in real time, route your nodes into an Output Hub:
- Press Shift + A or click the bottom toolbar Add Node button, then select Output Hub.
- Connect noodles by dragging from the right Out ports of your upstream nodes into the left In ports of the Output Hub.
- Click
☆ Set Primaryon the Output Hub header (or toggle it in the Right Sidebar Inspector).
A gold star badge (⭐ Primary) will activate on your Output Hub header. The Output Hub automatically concatenates your connected node variables in topological execution order, displaying the live synthesized prompt with a one-click copy button!
Best Practices for Visual Prompt Architecture
To keep your node graphs clean, readable, and scannable as your prompt pipelines grow:
- Group Clusters with Frames: Select a group of connected nodes and press Shift+F to encapsulate them inside a color-coded Frame.
- Name Your Node Titles Clearly: Use descriptive titles like "Brand Voice Rules" or "System Guardrails" so your pipeline is scannable at a glance.
- Save Frequent Layouts as Presets: When you build a prompt pipeline you love, select the nodes and click Save as Preset in the Inspector to store it in your Left Sidebar for instant reuse across all projects.
Conclusion
By breaking complex prompts into modular, visually connected nodes, you eliminate context loss and build AI pipelines that are easy to debug, scale, and share.
Ready to plug in your first noodles? Launch Nodestr and start chaining your prompt graph!